Scratch that...We are in Ecuador.
- Michelle
- Nov 5, 2020
- 4 min read
Updated: Mar 6, 2021
We adore our cat and were quite worried about her need of scratching things. It's a natural habit for animals with claws to maintain their claws' health, as well as relieve stress. She had behaved so well for the first week without something to scratch her claws in which was a great surprise. Our cat needed a scratching pad for two reasons: 1) to keep her healthy and happy and 2) to keep her from scratching the house furniture we don't own. We had thought we would be able to buy one once we got here...except after looking around town, after not seeing it in the main store back in Guayaquil, we weren't sure. So we did what we've done twice before: make a cat scratching pad using a hot glue gun, scissors, and three cardboard boxes. Please read the whole post before starting!
Unfortunately, I didn't take a picture right at the start. I was so focused on just getting it done for Sherlock who had just started scratching the bed. So hopefully the written explanation will help until we make another. If you need clarification, please send us a message and we will do our best to help you out!
Materials Needed:
Hot Glue Gun
Extra Hot Glue Sticks
Small and shallow cardboard box
Two medium to large boxes
First, take the smallest box. The size of the base (bottom) will be about the size of the scratching portion, make sure it is large enough for your cat to layout on. Sherlock tends to use it as a bed so I am assuming most cats will do the same. The edges you will want to be about 2 inches to 2.5 inches in height. So measure from the bottom up and mark where to cut down the edges of the box. As you can see in the first picture, the barcode sticker had been cut almost in half.

Second, measure the side you will be filling: short edge or long edge. You will be cutting out multiple pieces until it fills out the bottom base. Keep in mind the pieces will be slightly smaller having to fit INTO the base structure (subtract base layer of cardboard and the two edges). Measure one out by placing it inside (in the manner of the second photo) while snipping thin pieces off at a time until it fits snuggly in. Also, you don't need to cut as many that will fit into the box. Because you need to add some layers of hot glue in-between each layer of cardboard, it will take up quite a bit of space.

The second image shows me filling the shallow box in. I prefer the longer length of the box as that means less cutting for me. I had scissors and for the amount of cutting needed was going to hurt my hands...but the pain is worth it to complete a scratching pad for Sherlock. So onward!
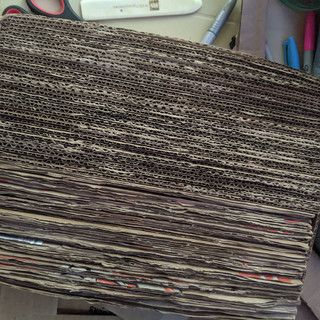
Third, plug in the hot glue gun to get it warmed up. Every 10-15 pieces you have cut out (not including your sizing/tracing piece), start gluing. The first layer of cardboard, glue to the wall, and the base so it sticks down onto the bottom securely. Each cardboard layer should be hot glued on both sides but every three should be glued at the bottom. Don't hot glue both sides at once! As soon as the layer is glued down to the previous layer, only glue one side of the newest layer to be added. One layer at a time, you will want to make sure it's pressed firmly down to the base and lined up with the rest before moving on. The top leveling does not need to be perfect, your cat will help level it with use. As you can see in the image below, you want to make sure the layers are glued down into the base, and the sides that are against the other cardboard layers. If you want to add extra security, gluing the left and right edges helps as well.

I noticed the two cardboard boxes I used were different. One half you can see the wavy cardboard center and the other half you cannot. I had the option of mixing it up, doing every other, or half and half. I wasn't sure the level of resistance or comfortability Sherlock would have or if there was any difference. But it did look nice so I went with that design choice. I would've wanted it to be the same across the board but it was a bit difficult to find cardboard boxes unlike in the US. It took us three separate days to get the amount of cardboard I needed for this project.
That's it! That's all you have to do in order to make a scratchpad for your furry friend.
Want to see what Sherlock tries the pre-glued product? Keep in mind, this is the day before she tried using it and I was able to purchase a glue gun so she was a bit warier for the final. She is just so fun to watch and we are glad she is happy!
We are both pleased she loves the scratching pad! How adorable is she?


If you want to see more of Sherlock you can follow her on Instagram @Sheerluck.Sherlock or get some behind the scenes of her by following us on Snapchat @Artemischo . Thanks for reading! We'd love to see your results and your happy pet enjoying your product!


Comments